
Tutorial: Carestream Kodak PracticeWorks Dental Software is currently being used by up to 26,000 dentists in the United States of America and yet very few of them use this amazing software to its fullest. Besides lightning fast extremely thorough notes, this software can also fill out prescriptions, write refusal notes, informed consents, post-op instructions, and your favorite chicken casserole recipe. This software in the last few years added another button feature called “Prescriptions”, but before that, the prescriptions were written in the “Forms” button section. The most likely reason why more dentist don’t use the forms function in this software is because it is difficult to program without help and this is why I’m addressing this subject today. So get ready to launch your everyday charting habits into overdrive!

Press the”Forms…” button:

You will not have all of these forms in your list, but you will hopefully have at least one prescription in this list. We are going to learn how to edit the “Rx for Lorcet 10/650” form by selecting it from the list and pressing “Edit form” button, and if you have no prescriptions, then you can follow along to the point were we make a new one and link it to a procedure button. Select the prescription you wish to edit and press “Edit form”.

If you have a prescription of something in your list it will look something like this. We are going to change our automatic prescription to comply with a new Florida State law by making the Dispensed number of tab from just a number, to a number with the number written next to it in (English), example from 16 Tabs, to 16 (Sixteen) tabs. Select “2 – Dispense (tabs)” and press the “Edit question” button: 
Next, select the “Multi-choice list” from the “Type:” pull down box and then press the “Add choice” button: 
Add your usual recommendations and then click “OK”. Once done click “OK” and you are free to edit the other variable for the form you are on. These variable don’t stand alone but instead are used inside a form that is made in another section called Documents. To see which document these variables link to look in the “Autolinks” seen at the bottom of 3 picture up.  This document is selected to merge the prescription variables you just edited and this document is set to print automatically after you edit the final form in the chart. This form is located under the “Expert” drop down menu listed at the top of the main PracticeWorks schedule page:
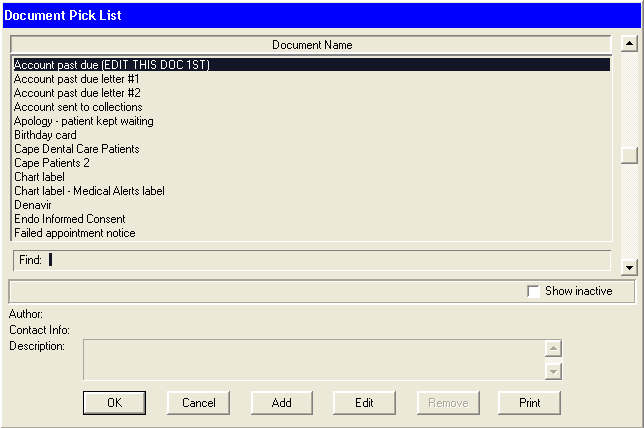
 Select the appropriate document and press the “Edit” button:
This is the actual set-up for the prescription that can be edited in many ways. CAUTION: Do play around too much with the format or you may make a mistake you will need profession help to remedy. To delete an unwanted variable on this form simply select it until it is grayed out and the cursor turns into an “?”, then press the delete key (not back-space). To the right find the form you are currently working on and press the “+” button to expand and see those custom variables that can be used for this particular form. The other variables in this list can also be used in this form, but may not make sense to do so.
Once you have edited the form/document go back and try out the Rx just to make sure it works properly.


Trouble-Shooting:
If you do not see the new multi-choice variable come up as you see it in the pull down box (two pictures up), then you may not have enough spaces set aside for that variable to occupy. Go to Expert>Automation Expert>Responses>Document…

Don’t select anything and press “Edit”

Don’t select anything and press “Edit Merge Fields”

Scroll down the list to the Forms Variable and select the one in question and press “Edit”

This “Display width” must be large enough to accommodate the number of character in the Multi-choice variable field on the form or you will not see all of the selected variable on the form. I chose 30 characters (where the “15” is above) so to cover any possible multi-choice variable I want to place inside this particular variable. I know, kind of dumb. It should be defaulted to the maximum number (30) characters the variable can hold. This is one of the reasons why PracticeWorks added the “Prescription” button next to the “Forms” button so it would be easier to program. BUT, you cannot link prescriptions under the “Prescription” button to procedure buttons like this:

Right click onto a procedure button and choose “Define AutoLinks”. I chose the “Ext” button.

These are the selections I have under this particular button. You will have different ones. To add a prescription form under the “Forms” section to this list for ultra-quick charting press the “Add” button.

Choose “Add form to patient” and press ‘OK”

Choose from the list of prescriptions the one you want to add to the procedure button list and press “OK”.

Press “Yes, …”

Leave the “Response is optional” button selected because you do not always want to write a prescription for this procedure. Press “OK”


The form for the prescription you chose is now in the list under the button “Ext”. To change its position in the list simply change the sequence number on the right side to the point in the sequence you wish this form to appear. You can place any form under any procedure button for ultra-quick charting. Too bad you cannot do this with the new “Prescription” button, yet!
Trouble -Shooting:
I ran into a problem changing the form Darvacet N-100 to something else because it is now off the market, and I didn’t want to go through the hassle of remaking the whole form. It seems you cannot just change the name of a form in PracticeWorks and use it over like in the “Notes” section. Instead, you need to press the “Inactive” button on the forms variable page and start with new variables.

See the little “Inactive” button in the lower left? If you no longer want to use these form variables then press the “Inactive” button and make new variables or when you get to the documents section to add your variables they will not be there. Of course, remember to link these new variables to the right document under the “AutoLinks” button. Good news is that you do not need to “Inactive” the document too, just edit it.
To make a new form with new variables then go into the “Forms” section and press “Define new”.

Don’t select anything and press “Define new”.

You simply fill in the fields with your new form names. This new Form will be for metronidazole.

Fill in the “Groups” as “Rx” then tab to the next field and type in “Rx for Metronidazole” and press tab and the next field will automatically fill in with “Rx for Metronida” because that is the maximum number of characters allowed inside that field. Put this form under the “Category” “Prescriptions” with the pull down box. If no prescription category is found then press the “Category” button and add it to your list.

Now finish the rest of the variables for this prescription with dispense, signature and refills by pressing “Add question”.


Now before you can “AutoLink” these new variables to a document you first have to create a new document (or at least edit an old one for these new variables). Go to the main schedule page and go to “Documents…”.

Select nothing and press “Add”

I usually pick “Plain paper” and “Patient data” but if you have a special letterhead you want to use you can. It will just set the tabs on the document to allow space for the letterhead. It would be a cool idea to have a dedicated printer with special Rx paper with a non-duplicatable paper pattern, but I haven’t figured out how to do that yet. Maybe someone could help me with that?

A blank document will appear and I have already added in the name of the form I want to make called “Rx for Metronidazole”, addressed to the “Patient” and to generate “Nothing” else. Note: I forgot to click the “Plain paper” button! Now you usually don’t want to have to enter and position all the different variables on the document if it has already been done in another document to your satisfaction. They are all located in the right side scroll down box somewhere, but who wants to find all of them again? If you by chance do not have any Rx documents at all, then you will have to create one from scratch by selecting the variable and positioning them onto the document.
The easy way to fill in the presription form is to just copy another one by closing out of this form and open another Rx in your list.

I picked “Rx for Amoxicillin” because the metronidazole Rx is going to look like this Rx. Press “Edit”

This Rx is already set up with the placement of variables in the right spots so just select the whole document and “Copy” and then press “Cancel”. Reopen the “Rx for Metronidazole” document and place the cursor on the blank page and “Paste”.

Now just change all the variable out with the ones listed under “Form: Rx for Metronidazole” in the right hand side scroll down. Press the “+” button next to the Form to see all the variable you made in the Forms section. Click on the old variable you want to delete until you see the “?” and press the “Delete” key. To add the new variable just double click on it and it will be inserted where ever your cursor was placed.


Now don’t forget to change the patient instruction part below the “cut line” of the Rx.

Now press “Advanced…”

Select “Edit before printing”, “Add to history” and “Keep copy of document on file” and press “OK”. This Rx is now going to be listed in the charting notes and easy to follow at a glance. The other newer “Prescription” button to the left of the “Forms” on the patient’s chart is very easy to use, BUT cannot be linked to a “Procedure” button. Instead, you have to enter the “Prescription” section separately to see what you have written and when. It’s not a big deal, but is an extra step, and you cannot have multiple choice pull down variable for the Rx’, instead you make multiple Rx’s of the same drugs with different dosages, or duh, just remember all the obscure prescription doses yourself.
Now as if this isn’t enough, we still have to AutoLink the form variables with the document you just created. It is pretty simple, and after you make a couple of these form/documents it will be a breeze.
Go back to the Forms menu:


Select the form you are working on and press “Edit form”.

Press “AutoLinks”

Press “Add”

Select “Create document” and press “OK”

Press the button “Create a specific document:” and press the “Select” button (the next box might just pop-up automatically).

Scroll down to find the document you want and select it and press “OK”

Press “OK”

Press “Always print immediately”

Press “Yes…”

Deselect “Response is optional” and press “OK”

Press “OK”.
To close out press “OK” until the last box then press “Cancel”
Congratulation. You now know more about PracticeWorks forms and documents than 95% of the PracticeWorks dentists out there.
To review why we went through all of this computer gymnastics just to write a simple prescription, we now can link the prescription to a procedure button and fire off Rx’s lightening fast during your charting. Hopefully your printer is located close by or you’ll have to take a hike for your signature.